
A creamy cappuccino with perfectly textured milk and a rich espresso base is one of the most satisfying coffee drinks in the world. While many people assume you need a professional espresso machine to make one, the truth is: you can craft an excellent cappuccino at home, even without expensive equipment.
With a few smart tools, fresh ingredients, and the right technique, you’ll be able to enjoy a high-quality cappuccino in your kitchen — any day, any time.
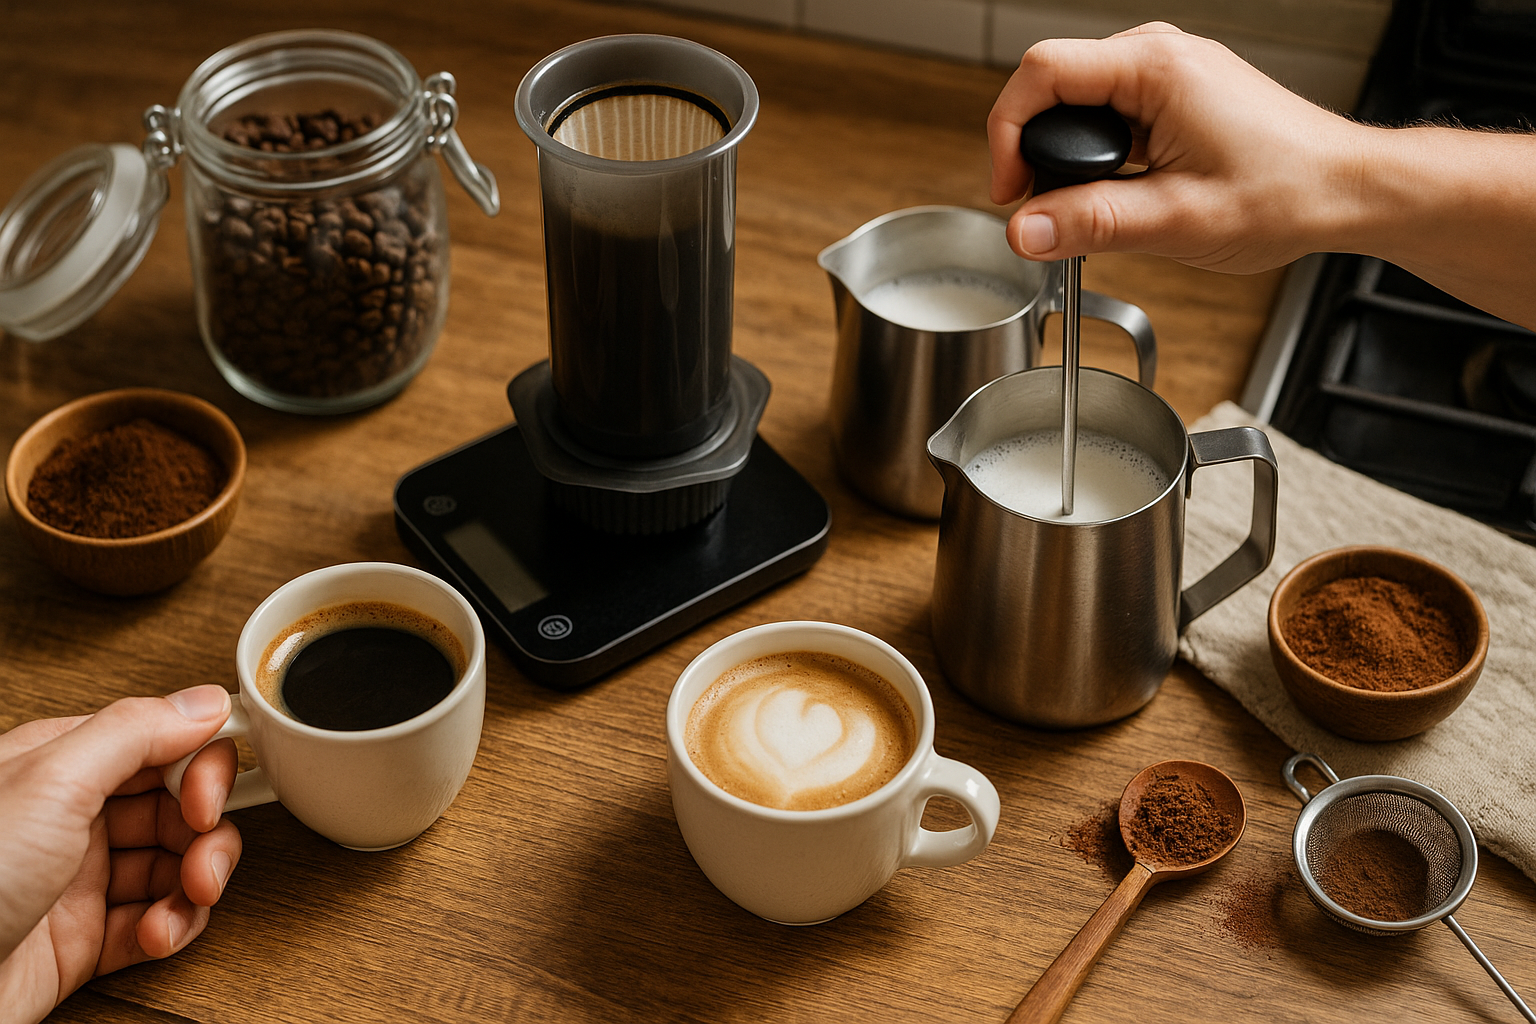
In this guide, you’ll learn step-by-step how to make a barista-level cappuccino without a machine, using simple tools like a French press, AeroPress, and a milk frother or even a jar. Let’s bring the café to your home.
What Is a Cappuccino?
Before diving into preparation, let’s clarify what a cappuccino actually is.
A traditional cappuccino is a coffee drink made with:
- 1 part espresso
- 1 part steamed milk
- 1 part milk foam
This 1:1:1 ratio creates a perfect balance between the intensity of coffee, the sweetness of steamed milk, and the light texture of foam.
A true cappuccino is usually served in a 150–180 ml (5–6 oz) cup — smaller than a latte — and enjoyed for its bold yet smooth taste.
What You’ll Need
You don’t need a $1000 machine or barista-level setup. Here’s your simple cappuccino toolkit for home brewing:
For the Coffee
- Fresh coffee beans (medium to dark roast, espresso-friendly)
- Burr grinder (for consistent fine or medium-fine grind)
- Brewer:
- AeroPress, Moka pot, or strong French press for espresso-like concentrate
- Digital scale (optional, but useful for consistent brewing)
For the Milk
- Fresh milk (whole milk creates the creamiest texture, but plant-based options like oat, soy, or almond milk also work)
- Manual milk frother, French press, mason jar, or electric frother
- Thermometer (optional, to control temperature)
Extras
- Cocoa powder or cinnamon (for dusting)
- Small serving cup (preferably ceramic, 150–180 ml)
- A calm morning, soft music, and a cozy kitchen atmosphere (optional, but recommended)
Step-by-Step: How to Make Cappuccino at Home Without a Machine
Let’s break it into two major parts: making the coffee and preparing the milk.
Step 1: Brew Strong Coffee (Espresso-Style)
While nothing fully replaces the pressure and crema of a real espresso shot, you can get very close using manual methods.
Option A: AeroPress (Most Versatile)
- Use 17–18g of finely ground coffee
- Add 60–70 ml of hot water (93–96°C)
- Stir for 10 seconds, then press gently
- Result: strong, smooth coffee with rich body
Option B: Moka Pot (Stovetop Espresso)
- Fill the base with hot water
- Add finely ground coffee to the filter (no tamping)
- Assemble and heat on stove until the upper chamber fills
- Result: bold, espresso-like coffee with good crema
Option C: French Press (Concentrated Brew)
- Use 1:10 ratio (e.g., 20g coffee to 200ml water)
- Brew for 4 minutes, then press slowly
- Result: intense and rich, though less concentrated than espresso
Once brewed, pour your coffee into a small cup and move on to the milk.
Step 2: Heat the Milk
Heat about 120 ml (½ cup) of milk — enough to fill your cup after foaming. Avoid overheating. The ideal milk temperature is 60°C to 65°C (140°F to 150°F). Too hot, and it will scald or lose its sweetness.
You can heat it in:
- A small saucepan, stirring constantly
- A microwave, stopping at 30-second intervals and stirring
If you don’t have a thermometer, aim for hot but not boiling — you should be able to touch the outside of the container comfortably.
Step 3: Froth the Milk
Now the fun part: making foam!
Method A: French Press (Best for Microfoam)
- Pour hot milk into the press (don’t fill more than halfway)
- Pump the plunger up and down quickly for 15–30 seconds
- Watch it double in volume and become creamy
Method B: Mason Jar
- Pour hot milk into a glass jar with a lid
- Screw the lid tightly and shake vigorously for 30–45 seconds
- Let it sit for a few seconds to settle
Method C: Handheld Frother
- Place frother in hot milk and turn on
- Froth until desired foam is created
- Tap the container gently on the counter to pop large bubbles
The goal is to create fine, silky microfoam, not just airy bubbles. This foam gives cappuccino its luxurious texture.
Step 4: Assemble Your Cappuccino
Now let’s bring everything together.
- Pour your brewed coffee into the cup (around 30–40 ml)
- Slowly add steamed milk, using a spoon to hold back the foam
- Finally, spoon the milk foam over the top until the cup is full
- Dust with cocoa powder, cinnamon, or even nutmeg (optional)
Observe the classic 1:1:1 balance. A good cappuccino will have three visible layers: dark espresso at the bottom, creamy milk in the middle, and dense foam on top.
Tips for Perfecting Your Homemade Cappuccino
- Use whole milk for best texture and natural sweetness
- Grind fresh coffee just before brewing
- Keep your milk below 70°C to avoid burnt flavors
- Swirl and tap the milk before pouring to create a smooth finish
- Clean your tools immediately to preserve flavor and hygiene
With practice, you’ll develop your rhythm — and might never crave café cappuccino again.
Plant-Based Milk Options
You can make excellent cappuccinos with dairy alternatives, though some work better than others.
- Oat milk: creamy and neutral, froths well
- Soy milk: great foam, slightly nutty flavor
- Almond milk: lighter texture, can separate when hot
- Coconut milk: sweet and aromatic, but less foam
Look for barista versions of plant-based milks — these are formulated to froth like dairy milk and maintain stability in coffee.
Cappuccino vs. Latte vs. Flat White
It’s easy to confuse milk-based espresso drinks. Here’s a simple comparison:
| Drink | Espresso | Steamed Milk | Foam | Volume |
|---|---|---|---|---|
| Cappuccino | ⅓ | ⅓ | ⅓ | ~150–180ml |
| Latte | ⅓ | ⅔ | Thin layer | ~240–300ml |
| Flat White | ⅓ | ⅔ | No foam | ~150–180ml |
Cappuccino is ideal for those who want a bold coffee flavor balanced by texture and sweetness — without being too milky.
Healthier Additions and Variations
Cappuccino at home is also an opportunity to add natural, healthy elements:
- Cinnamon – anti-inflammatory, sweet without sugar
- Cocoa powder – rich in antioxidants
- Maple syrup or honey – for light natural sweetness
- Collagen powder or protein – for an energizing boost
- Adaptogens – like ashwagandha or maca for stress balance
These additions can turn your morning cup into a small ritual of self-care and well-being.
Final Thoughts
You don’t need a fancy machine or a trip to the café to enjoy a velvety cappuccino. With a little know-how and a few clever tools, you can create an artisan-level drink right at home. And better yet — you can personalize it exactly to your liking.
Learning to make cappuccino without a machine empowers you to take control of your coffee routine, connect with the process, and create something delicious and meaningful. It’s a small daily act of craftsmanship that can elevate your mornings and impress your guests.
So heat the milk, grind the beans, and pour with care. You’re just a few steps away from a coffeehouse experience in your own kitchen.

I’m an economist with 15 years of experience in strategic planning and a lifelong passion for wellness and natural living. As a self-learner, I created Herbalife Balance to share insights on healthy eating, mindful habits, and an active lifestyle. Tennis enthusiast and nature lover, I believe in balance as a path to well-being. Through this blog, I help others live healthier, more conscious lives.