
The cappuccino is one of the most iconic and beloved coffee drinks worldwide. With its perfect balance of espresso, steamed milk, and frothy milk foam, a cappuccino is not only a treat for the taste buds but also for the eyes. However, brewing the perfect cappuccino is an art that requires practice, attention to detail, and knowledge of the right techniques. Whether you’re a beginner barista or a seasoned professional, this guide will walk you through the essential tips and techniques to craft the perfect cappuccino every time.
1. Understanding the Key Elements of a Cappuccino
Before diving into the brewing process, it’s essential to understand what makes a cappuccino unique. A classic cappuccino consists of three main components:
- Espresso: The base of the cappuccino, giving it its rich, robust flavor.
- Steamed Milk: The creamy component that adds sweetness and smoothness to the drink.
- Milk Foam: The frothy layer that crowns the cappuccino, providing texture and volume.
The ideal cappuccino has a perfect balance of these three elements, with equal proportions of espresso, steamed milk, and milk foam. A traditional cappuccino is typically served in a 6 oz (180 ml) cup, which provides just enough room for the components to be balanced correctly.
2. Choosing the Right Coffee Beans for Cappuccino
To brew the perfect cappuccino, the coffee beans you choose play a critical role. For a traditional cappuccino, you’ll want to use high-quality espresso beans. These are usually a blend of Arabica and Robusta beans, offering the perfect balance of flavor, aroma, and crema.
Arabica vs. Robusta
- Arabica Beans: Known for their smooth, complex flavors, Arabica beans are often used in premium espresso blends. They provide a lighter, more nuanced taste, with fruity, floral, or nutty notes.
- Robusta Beans: Robusta beans have a stronger, bolder flavor and a higher caffeine content. They create a thicker crema and a more intense coffee, which can add depth to the cappuccino’s flavor.
For a cappuccino, many baristas prefer a blend of 70% Arabica and 30% Robusta for the perfect balance of smoothness and intensity. The beans should be freshly ground to ensure the best extraction.
3. The Importance of a Good Espresso Shot
The foundation of any great cappuccino is a well-pulled espresso shot. A high-quality espresso shot is rich, concentrated, and full of flavor. To pull the perfect shot of espresso, several factors come into play:
1. Fresh Beans:
Use freshly roasted coffee beans and grind them just before brewing. The grind should be fine, similar to powdered sugar, but not too fine to clog the espresso machine’s portafilter.
2. Proper Dose:
Typically, a double shot of espresso uses around 18-20 grams of coffee grounds. Ensure the dose is consistent for a balanced extraction.
3. Tamping:
After filling the portafilter with coffee grounds, tamp them evenly and firmly to create a smooth, level surface. This ensures even water distribution during extraction.
4. Brewing Time:
A good espresso shot takes about 25-30 seconds to brew. If it’s too quick, the shot will be under-extracted and taste weak; if it takes too long, it may be over-extracted and taste bitter.
5. Crema:
The shot should have a rich, golden crema on top. The crema is a sign of a well-pulled espresso shot, contributing to the texture and flavor of the cappuccino.
4. Steaming Milk for the Perfect Texture
The next step in making a cappuccino is steaming the milk. The goal is to create microfoam, a smooth and velvety foam that can easily blend with the espresso. The texture of the milk is just as important as the espresso, as it adds sweetness and a creamy mouthfeel to the cappuccino.
Choosing the Right Milk
The type of milk you use will affect the texture and flavor of your cappuccino. Here are some options:
- Whole Milk: Whole milk creates the creamiest, sweetest foam due to its higher fat content. It’s the most popular choice for cappuccinos.
- Low-Fat Milk: Low-fat milk produces less foam and may have a thinner texture, but it still works for cappuccinos if you prefer a lighter drink.
- Non-Dairy Milk: Oat milk, almond milk, and soy milk are popular non-dairy alternatives. Oat milk is especially favored for its ability to create a creamy, sweet foam similar to whole milk.
Steaming Technique
To steam milk properly, follow these steps:
- Fill the Steam Wand’s Pitcher: Pour milk into the steaming pitcher, filling it only about one-third full to allow space for the milk to expand.
- Purge the Steam Wand: Before steaming, purge the steam wand by turning it on briefly to release any water inside.
- Submerge the Steam Wand: Insert the steam wand into the milk, just below the surface. Turn the steam wand on full power.
- Create a Vortex: As the milk heats, angle the steam wand so that it creates a vortex or whirlpool in the milk. This motion helps evenly distribute the heat and create smooth microfoam.
- Monitor Temperature: The ideal temperature for steamed milk is between 60-65°C (140-149°F). Use a thermometer or rely on the feel of the pitcher; when it’s too hot to touch comfortably, it’s ready.
- Stop Steaming: Once the milk has reached the correct temperature and texture, turn off the steam wand and remove it from the milk.
Foam Texture
The foam should be velvety and smooth, not dry or bubbly. The key is to create microfoam, which is foam with tiny, evenly distributed bubbles. It should have the texture of wet paint and be easy to pour.
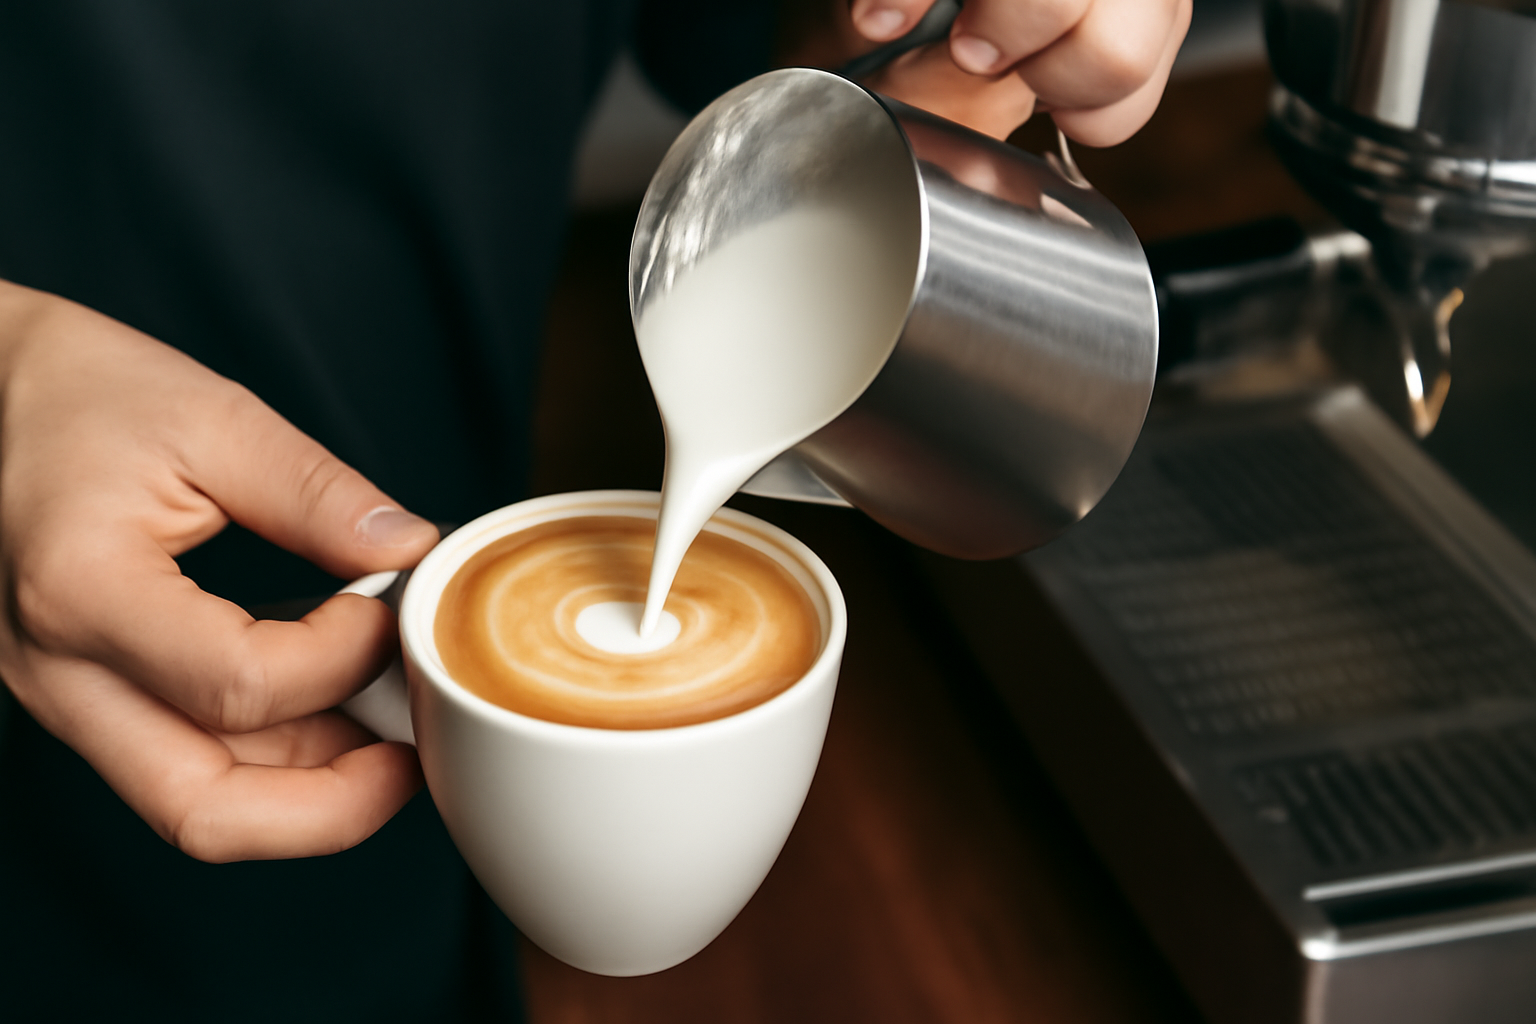
5. Pouring the Perfect Cappuccino
The final step is combining the espresso and steamed milk to create the perfect cappuccino. Pouring the milk is where the magic happens, and it’s essential to do it with skill and precision.
The Pouring Technique
- Swirl the Milk: Before pouring, gently swirl the steamed milk to integrate the foam and liquid milk. This helps ensure the milk has a smooth texture for pouring.
- Pour the Espresso First: Pour the freshly brewed espresso into the cappuccino cup. You should aim for around 1 ounce (30 ml) of espresso for a single shot, or 2 ounces (60 ml) for a double shot.
- Add the Steamed Milk: Begin pouring the steamed milk slowly, holding the pitcher at a slight angle. As you pour, allow the milk to mix with the espresso. Once the cup is about two-thirds full, tilt the pitcher more vertically to pour the foam on top.
- Create the Foam Cap: Continue pouring until the foam forms a nice, thick cap. The milk should be velvety and smooth, not overly frothy.
- Finish with Latte Art: If you’re feeling adventurous, you can add a touch of latte art to your cappuccino by carefully pouring the milk to create a heart, rosette, or tulip design.
6. Tips for a Consistent Cappuccino Every Time
- Use Fresh Coffee Beans: Always use freshly roasted and freshly ground coffee beans to ensure maximum flavor.
- Get the Right Milk Texture: The texture of the milk is crucial. Aim for silky microfoam, not airy foam.
- Practice Your Technique: Brewing the perfect cappuccino takes practice. Don’t get discouraged if your first attempts aren’t perfect.
- Keep Your Equipment Clean: Regularly clean your espresso machine, steam wand, and other equipment to ensure the best results and longevity of your tools.
Conclusion
Brewing the perfect cappuccino is a combination of art, science, and technique. By understanding the importance of quality beans, mastering the art of pulling a great espresso shot, and perfecting the steaming and pouring techniques, you can create a cappuccino that rivals those from the best coffee shops. With a little practice and patience, you’ll be able to craft a cappuccino that’s not only delicious but also a visual masterpiece. So, grab your espresso machine, your favorite beans, and start brewing the perfect cappuccino today!

I’m an economist with 15 years of experience in strategic planning and a lifelong passion for wellness and natural living. As a self-learner, I created Herbalife Balance to share insights on healthy eating, mindful habits, and an active lifestyle. Tennis enthusiast and nature lover, I believe in balance as a path to well-being. Through this blog, I help others live healthier, more conscious lives.